Welcome
To
![]()
Building your own custom Holding Tanks
By Gene Lewis
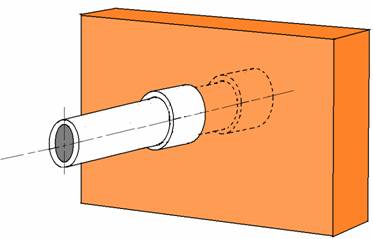
DETERMINE THE SIZE Determine the size and shape of the tank that meets your needs. Make your box to fit the size and shape that you need. Draw a sketch of your proposed tank(s) laying out the location and sizes of the holes you will need. Determine locations of drain hole, sight glass and any other holes that may be needed for your custom tank. Sizing a Tank Square or Rectangular: W x H x L divided by 231 = # of Gallons Round: 3.14 X D Squared X length. (Pie times Diameter squared times length) Gives you cubic inches if D and L are inches. You can then divide the Cubic Inches by 231 for # of gallons. Cut the parts, sides, bottom and top, corner braces, etc and do a temporary dry fit. (If you are sure of yourself then you can skip the dry fit step.) I used ¾” plywood for this project. (An interesting observation I have made; Good money is spent for rectangular poly tanks and the first thing that folks do is in case the poly tanks with plywood. I chose to make the plywood tank and coat the tank with fiberglass inside and out.) THE FITTINGS Cut and make your plastic fittings – See figures 1, 2, 3 and 4.
I used a piece of ¾ inch PVC pipe 3½ inches long, and 2 pieces of 1” PVC for the collars. 1” PVC will slide over the ¾” PVC making an excellent collar. Clean the ¾” pipe with PVC cleaner and then cement one collar flush with one end of the pipe. Allow glue joint to dry. It should look like Figure 2.
Drill holes for all plastic fittings and install all fittings. Apply a liberal coat of sealant to the fitting and insert from the inside being sure to fill all crevices with the sealant. Once the fitting is in place you can use a wet rag to smooth out the joint. This will be helpful later as you apply the fiberglass resign. (I used a 25 year Red Devil Latex Sealer Calk. Found it on sale). Allow sealer to set. Apply PVC glue to the second collar and pipe and slide it into place against the outside of the plywood. When glue has set apply a smooth bead of sealant to the collar and plywood. Again smooth the bead with a wet rag. Starting with the bottom portion of the tank, assemble the sides and bottom using a good grade of glue on all joints and secure with screws. I used dry wall screws when I assembled mine.
Cut some strips of fiberglass cloth 3 to 4 inches wide. Coat all the inside joints with a liberal amount of resin and lay the fiberglass strips into place, being careful to remove all air pockets and being sure to saturated the cloth then allow resin to set. Once resin has set apply a second coat overlapping the first coat by about 3” in all directions. When you are satisfied that all the joints are sealed and the resign has cured you can apply the first of 2 coats of resin to the remainder of the inside of the bottom. Be sure to coat all surfaces including the edges. When 1st coat has cured apply the second coat and allow it to cure. Now it is time to coat the outside of your holding tank with resin. My suggestion is to do the same with the outside as you have done with the inside. Using strip of fiberglass cloth 3 to 4 inches wide. Coat all the outside joints with a liberal amount of resin and lay the fiberglass strips into place, being careful to remove all air pockets and being sure to saturated the cloth then allow resin to set. Once resin has set apply a second coat overlapping the first coat by about 3” in all directions. Apply 2 more coats of resign to the outside and allow it to cure. After the bottom has cured fill tank at least 2/3’s full of water and allow to set at least a couple of days to check for leaks. If you did not get in a hurry and was careful about the application of the sealant and resin you should not have any leaks. THE TOPApply a liberal coat off resign to all sides of the two tops and allow to cure. Apply a second coat and allow to cure. Check the edges of the bottom for any really rough spots and sand if necessary to get a smooth fit. A liberal coat of caulking will fill most minor imperfections. When the tops are cured then its time to install the large top. Apply a liberal coat of silicon caulking to the top edge of the box and then screw the large top into place. Tank should be sealed at this point except for the smaller top. Dry fit all piping attached to the top that will be feeding the tank. When you have completed the dry fitting apply a liberal coating of sealant calking and screw the smaller top securely in place. Once the top is in place and secured its time to paint the holding tank the color you desire. TO PREVENT FREEZINGA super simple way to prevent freezing (short of staying in the deep South from Late Fall to Early Spring) is to place the holding tank on a waterbed heater with the thermostat set around 50 degrees. These are available new, at Swap Meets, Yard Sales, Used furniture stores and e-bay. Place the waterbed heater directly under the holding tank and plug it in to an AC outlet. Set the thermostat to the desired temp and forget about frozen holding tanks. THE INSTALLATIONA 2” X 2”, a ¾” X 2” or L brackets (or combinations thereof) will hold the tanks in place unless you decide to do a bunch of wheelies.
~ ~ About the Author ~ ~ Gene Lewis received a B.S. Degree in Industrial Arts from East Carolina University, in 1963. He spent 7 years in the classroom as an Industrial Arts Teacher and then ventured into business for himself in sales and sales management. During the past 30 years he has continued his interest in different businesses as well as the industrial trades. In 1965 he built a fold up camper trailer complete with a bed slide-out. Then in 1967 he built a 10’-6" slide in truck camper and in June of 1968 he and his wife made an 8 week trip to Alaska. Some 4 years later he moved up to Class A Motor Homes. It was during this time he was introduced to converted buses and was bitten with the ‘bus nut bug’. Over the years he has remained active in designing and repairing different types of RV’s and accessories. With the demands of a growing business and family the idea of converting a bus had to remain only a dream. The dream became a reality, when out of the blue, a deal was struck for a 1968 Model 05 Silver Eagle in great shape, complete with all the records and paper work from the day it was built in Belgium. The decision was made to convert the bus to a custom coach done by him and for him…. his way. Gene, with is wonderful wife Frances, have enjoyed the world of camping and RVing since the began there wonderful trip, called marriage, some 43 years ago. He and his wife have two married children. They presently make their home in Buies Creek, NC 27506. = = = = = = = = = = = = = = = = = = = = = = = = = = = = = = = = = = = = = = = = = = = = = = = = = = = = = = = = = = = = = = = = = = = = = = = = = = = = = = = = = = = = = = = = = = = = = = = = = = = = = = = = = = = = Disclaimer: This article is for information and educational purposes only. Any liabilities resulting in the use of this method of raising the roof of a bus is strictly confined to the individuals involved in the actual procedure. 7.10.06 |