Welcome
To


Back Fred Hobe Pg2 Fred Hobe Pg3 Fred Hobe Pg4 Fred Hobe Pg5 Fred Hobe Pg6 FAQ

North Florida Bus Conversion

C. Fred Hobe
Rt. 2 Box 169
Madison, FL 32340
1 850 673-8446

Please email Fred with you comments and thank him for all the time he has taken to provide this information at:
mailto:cfhobe@gmail.com


"Tips from a Pro"

Tips on helping your engine run 
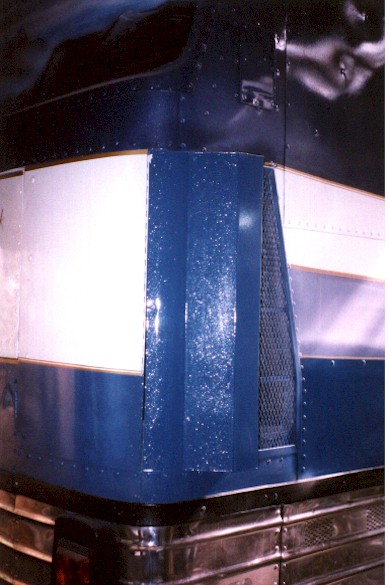
cool

When I installed my new motor, an  8V71 Turbo with N 80 injectors, I found that pulling a car at any speed over 65 caused my temperature to climb. By opening the back doors and leaving them open I could run 70 to 75mph without much heating problem at 95 degree out side temp. I bought the two lower panels from International Bus Parts that are ventilated, cost $320. As the upper panels are painted I went to an air conditioning shop and was given the sides off a whole house house unit. I cut the ventilators off the unit and weld it to the top door panels . This opening is about 21 by 11 inches and the two ventilators fit just right. I then cut the door skin to fit the opening and painted to match . These upper panels cost nothing and will let out more hot air than what I could have got for another $300. I think that it looks real cool and at a big saving. If you don’t want the S.S. at the bottom you can save big. Try it if you are having any heat problems you may like it.

Fred_Hobe_engine_door_cooling .jpg (80602 bytes)

Tips on helping your engine run cool - High Speed Pulley

As more and more converters go to bigger motors on MCIs it becomes very hard to cool the motor with out a lot of expensive parts. I have given some tips and here is one more that will be a big help, and at a modest price. The MCI 7 and 8 have a 8.5 pulley on the squirrel cage fans. The 9 has a 8 inch which is not very much better. You can get a 6.5 from Granger or and good bearing and drive shop. The thing that you can’t get is the tapered shaft that will fit the fans shaft. You have to buy a straight shaft that is ¾ inch and take it to a machine shop and have the taper and the key way cut into it. I took the original pulley and they matched the taper. Now it is exactly as the original was. It cost me $50 to have this done.

The 6.5 pulley is the only size that you can go to as the C belt which is on the coach is 124 inch. The next size smaller is 119 inch which will work on the 6.5 pulley. It seems that they come in 5 inch differences at this big size. The difference is about 500 RPM faster at running speed. This will pull in a lot more air and not destroy the squirrel cage fans, if they are in good shape.

The advantage to my system is that you can install any size pulley an the center hub. If you go with the 7.5 and need more air you can just buy a smaller size pulley. The adjustment on the 7 8 and 9 can adjust down to 6.5 with out buying a smaller belt. I don’t advise going to 6.5 , if the fan is not in good condition as it really pulls in a lot of air. Also you need to ensure your radiators are clean.

If anyone is interested in having a high speed pulley, I'll make them available for $250.00. And I guarantee it to lower your temp 10 degrees. I also send instructions on how to install it right.

Fred_Hobe_cooling_pulley_mod.jpg (63181 bytes)

On the two squirrel cage fans there are four rubber or plastic shrouds that cause the fans to pull in max air. These need to be replaced on most old coaches. The way to tell is to look inside. If the shroud does not come to the center of the fan it needs to be replaced. The new ones will come very close to the fan. They cost about $30 each at international bus. But the best ones you can have made at a local tin shop. Have them made so that they come to the center of the fan blades. Another way to tell is to feel them if broke they will have a rough edge on them. Also seal the door on the fans so that no air can be sucked in around them. Also make sure that air can’t be pulled around your radiators.There is a small hole in the center of each fan were there was a cold weather adjustment. I plate over this so that all the air comes out the bottom. When you are working on the fans make sure that you clean them. They will have years of dirt on them and a good cleaning will make them move more air. While you are cleaning, go to an air conditioning shop and buy a gallon of condenser cleaner. Spray on your radiator 
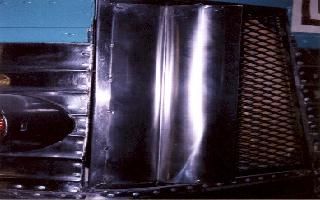
and wash off. You will be surprised on how much cooler it will run.
Fred_Hobe_fan_shrouds.jpg (15101 bytes)
The above pictures show how the shrouds look after they are taken off. Top shows new rubber shroud, bottom shows old one with chips out of it. There are two bolt that hold the end ones on and you won’t be able to move with out heating and cooling nut quickly. Don’t break or you will have a hard time fixing.

MCIs have a tendency to run hot when you get them in a hard pull at high altitudes. There is a after market plastic model made that sales for about $50. I found that I couldn’t tell that it did any good. So I made my own design, That will really pull in some air.

For this you will have to have a tin shop make it, if you don’t have a Break and a roll and shear. Remove both of the screens and take them to your tin shop. Have them make and weld the scoops to the outer frame of the screen. It should rap around the back of the screen 4 inches as this get out in the front were the air can be forced in. Have the scoops stick out 3 to 31/2 inches. The bottom and the top should be closed so that all the air is forced in. If your screens have that soft alum. wire in them have it taken out and replaced with S. S. expanded metal . It is very tough and looks good. Below you will see two types, one has rolled face and the other is made at a 45% flat on top design. Both work real good and dropped my operating temp 10 degrees in real hot weather. They have no effect when idling.

Fred_Hobe_AirScoop_1.jpg (72703 bytes)     Fred_Hobe_AirScoop_2.jpg (64898 bytes)

Tip - A better way for your blower box inlet rings

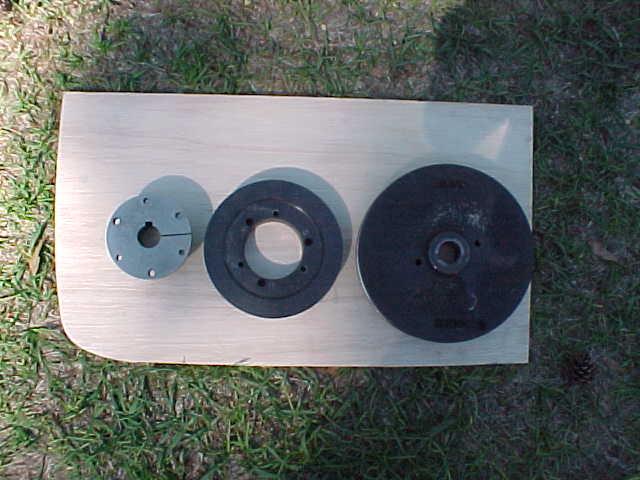
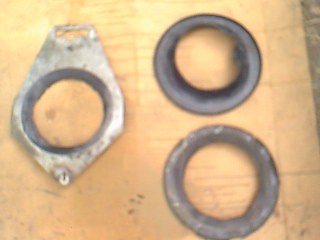
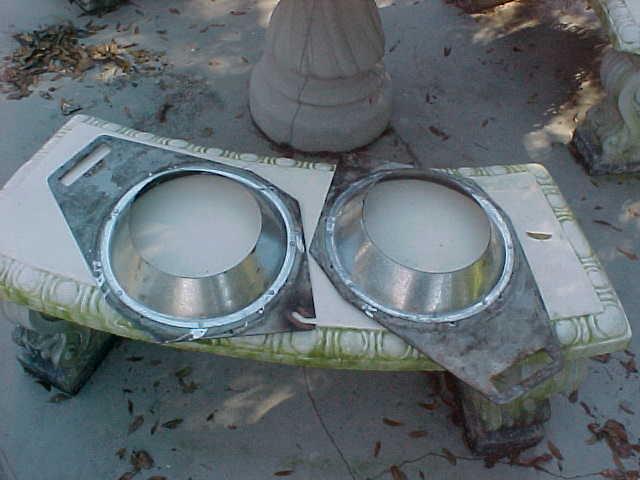
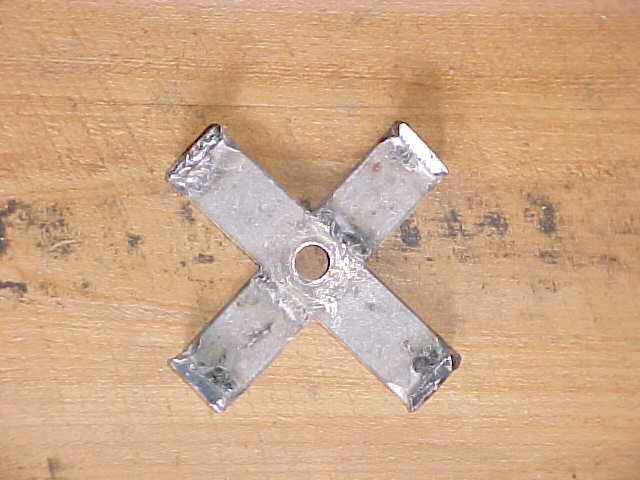
The plastic inlet rings that make the squirrel cage fans work to there maximal, from ABC bus cost $140.00 and only last a few years. Then they start to crack and go bad. A better way to do the same thing is to have a tin shop make up four inlet rings out of 20 gage galvanized metal. Cost was $15.00 each, with a saving of $80.00. And they will last the life of the coach. Below is a photo of the cones that I had made. The rubber one were on the coach for just over two years and about 30,000 miles. The heat had cracked them. The reason that I found this out was that the seals were leaking and I had to remove both blowers two change the seal. I didn’t want to install the rubber inlet rings that weren’t going to last.
Fred_Hobe_metal_inlet_rings.jpg (50821 bytes)

Tip on building a freeze proof box for holding tanks

I use 100 gallon tanks as they can be shipped by UPS. First measure your tanks length and width. Now add 7 inches to the width and length. Cut your bottom piece of plywood so that your splice will be across the width to make it the right length. I use 1/2 inch plywood. Now put 1/2 by 1/2 inches strips around the bottom. On the inside of the strips put your sides and end pieces . The end and sides should be cut 3 inches taller than the tank.Screw and glue sides and ends together. Place corners in and screw them together.Now install your 1-1/2 insulation board on the bottom . Cut you sides and end insulation board 1-1/2 less than the height of the side pieces. Leave the back end piece out and install a 1-1/2 piece around the top but leave the end piece off for, now install your tanks. Press the tanks hard up into the insulation board to make a impression. This tells you were you need to drill your holes. After the holes are drilled and tanks are out you can place your water bed heater under the water tank. The tanks must have at least 5 inches of water in them at all times when you have heater on. Now put tanks back in box and put the end piece of insulation in and install the top strip. Place the insulation board on top and press it down on top to make impression. Lay it on top off plywood and drill holes for fittings Screw top on but don't glue it until you are ready to install fittings. You can now install in your coach and bolt to floor with carriage bolts down through the outer rim that runs around the bottom. I use the high density insulation board, the pink stuff. You now have water, black and gray tanks that want freeze in winter and your water tank won't get hot in the summer.

Fred_Hobe_holding_tank_box01.jpg (36874 bytes) Fred_Hobe_holding_tank_box02.jpg (68824 bytes)
100 gallon tanks Water bed heater used under tanks
Fred_Hobe_holding_tank_box03.jpg (52112 bytes)
Completed tank enclosure

Tip on building for future satellite.

When you have all your wires and satellite installed on your coach and are ready to spray foam the insides, it pays to run a conduit to a clear space on the roof to be able to install any new type system that may come down the road in the future. In the front of your coach at a point that you can get to, bring the conduit down and bend it to come out at a 90 degree angle. Drill a hole in a piece of plywood that the conduit will fit through and tie it in to coach. After foaming plywood can be taken off so plywood skin can be installed. Run conduit to clear place on roof and drill a 1 inch hole in roof then drill two 3/16 holes next to sides of conduit and tie in with plastic handy ties. Then put a little ball of fiber glass in the opening and install duct tape over it.Then go up on roof and install a 4 by 4 " aluminum patch over the holes put caulk on the patch and screw down with S.S. sheet metal screws. Now when you need to you can remove patch and pull what ever kind on cable that may be required.

Tip on what I use to cut foam

I have been ask several times this past year on what I use to cut foam. Most foam companies charge as much to cut it as they do to spray it on. I make mine out of 1 1/2" by 1/4" thick steel that I drill a 5/8 hole in the middle of a 4" long piece. I then weld two 3/8 nuts on each end, I leave them blunt. This is what I use on a 4 1/2 " heavy duty grinder,. that turns 6K. On the 3K,  7 inch grinder I make an X cutter that is 5 inches long. These cut the foam and they will make it look like pop corn, not near as much dust as grinding as wire brushing it off. I start in the rear and open the rear window and sit a fan in it. Then I put a fan close to were I am cutting to blow the dust and chips toward the front. Wear a mask and good goggles. The roof is the hard part as you need to hold the weight of the grinder over head. It will take about a day to do a good job.

fred_hobe_cutting_foam01.JPG (35280 bytes) fred_hobe_cutting_foam03.JPG (29136 bytes) fred_hobe_cutting_foam02.JPG (32180 bytes)
1-1/2"x4"x1/4" thick steel, 5/8 hole in the middle. Two 3/8 nuts on each end 4 1/2 " heavy duty grinder Finished look

Tip on how to fix the cable on MCI 7 and 8 baggage door lift cables

Find the top of the spring in the vertical spring container and cut two of the sections between the holes out. This will let you pull the end of the spring out so that you can put your new cable on. I make the cables up from stock material from Home repair stores. Home Depot has the cable and compression ends in there garage door department. I put the cable through the sleeve and put a nail behind it and squeeze in two places in the vice. On the clevis end I slide clevis on, put small sleeve on and slide it down cable, then I open the end a little and put a ball of braze on it. Then I slide sleeve down and crimp as I do on the eye end.

Cost about $3.00. New one from ABC over $15. This will save you from taking the guard off the side of the coach and about an hour in time. More if you have built in cabinets and other things in the bays as most do. So cut them out before you build them in. Take a philips screw driver and put in the end of the cable and pull it down in the hole that it fastens to and lower the door about 6 inches, Now put a pair of vice grips on the cable up at the pulley, Raise door and put pin in clevis. And you are done takes about 5 minutes.
Fred_Hobe_baggage_cable_repair.jpg (39924 bytes)


Tip on drilling overhead to install your plywood.

When you have about 400 screws to install on your ceiling to hold plywood u, it becomes a real job when you have a raised roof. At the end of the day your arms are killing you. I found that it is a lot easier to pull up with my arm than it is to hold the drill over head and push. I can drill all day and not hurt. Pictures explains how to make a board to fit the thumb push indent on the drill. I tape a piece of foam rubber on the bottom were your hand pulls up on board.

Fred_Hobe_drilling_overhead01.jpg (42676 bytes) Fred_Hobe_drilling_overhead02.jpg (45088 bytes)


Back Fred Hobe Pg2 Fred Hobe Pg3 Fred Hobe Pg4 Fred Hobe Pg5 Fred Hobe Pg6 FAQ

Information Systems Management.
Disclaimer and Copyright notices